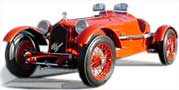

Building your first Pocher model is a daunting undertaking. The K71 model can be used as a great first model. There are only four famous wire wheels to do and no finicky doors or top to fit. You can even leave off the fenders and turn the model into a dirt racer like the one above. Here are a few notes you might find useful in your construction of one of these fine models.
| Pocher K71 Alfa Romeo Silver Bullet Note 1 |
 |
| To complete this kit, one can use a K71 or a K78. Molds on the older kits are better. I prefer to use a K71.
|
| Pocher K71 Alfa Romeo Silver Bullet Note 2 |
|
|
| Notice we have removed the horn from this racing car. As an exercise for a show in Detroit in 2007, this entire model is painted using Alclad II paints. These paints are easy to use. They go on very easily right out of the bottle and cover very nicely. Some of the colors are really unusual and give a very realistic metallic finish. Unlike many metallic paints they have absolutely no sparkle in them. The finished parts look just like real steel. On the other hand, there are a couple of the colors that have almost no adhesion properties. For instance the Stainless Steel and Chrome rub off with the slightest pressure. Use them only on parts that will not be touched.
|
| Pocher K71 Alfa Romeo Silver Bullet Note 3 |
|
|
| Notice the weathering on the block. The wash is a simple black Tamiya wash over the entire engine. This is, after all, a racing car.
|
| Pocher K71 Alfa Romeo Silver Bullet Note 4 |
|
|
| Notice the rivets going down the side of the body and the original space for the passenger window has been removed.
|
| Pocher K71 Alfa Romeo Silver Bullet Note 5 |
|
|
| Here is a good picture of the overall look of the chassis as it’s being assembled. The engine head will remain available for removal to view the functioning pistons.
|
| Pocher K71 Alfa Romeo Silver Bullet Note 6 |
 |
| This weathered radiator will be visible through a scratch-built radiator grill.
|
| Pocher K71 Alfa Romeo Silver Bullet Note 7 |
|
|
| One can start to see the interesting wiring, as seen on the real racing cars of those days.
|
| Pocher K71 Alfa Romeo Silver Bullet Note 8 |
|
|
| Here is a good picture showing the overall look of the Duraluminium paint we used. These Alclad paints work wonders. They dry very fast and are so fine that they do not cover any details in the model. Of course the flip side of that is that the body has to be finished to perfection before painting. Also, the paint is extremely difficult to lay on large surfaces. The picture clearly shows the different colors from one panel to the other. We had to spread about seven coats of paint to finally get everything evened out. This is expensive paint.
|
| Pocher K71 Alfa Romeo Silver Bullet Note 9 |
|
|
| Here is a picture showing some rivets and some wiring. There will be more wires and rivets all around the bottom of the body.
|
| Pocher K71 Alfa Romeo Silver Bullet Note 10 |
|
|
| Here’s a nice shot showing some interesting paint work on the springs.
|
| Pocher K71 Alfa Romeo Silver Bullet Note 11 |
|
|
| This shot shows the nice ultrasuede we used for the seats.
|
| Pocher K71 Alfa Romeo Silver Bullet Note 12 |
|
|
| This is another shot of the engine showing the nice efect that good, metallized paints give. We use Alclad for our models.
|
| Pocher K71 Alfa Romeo Silver Bullet Note 13 |
|
|
| It took some effort to get the body looking this nice.
|
| Pocher K71 Alfa Romeo Silver Bullet Note 14 |
|
|
| The steering wheel is covered and we eventually closed the hole over the dash with a scratch-built insert.
|
| Pocher K71 Alfa Romeo Silver Bullet Note 15 |
|
|
| Finallly, if you absolutely love building the wheels on the Alfas you will be completely satisfied when you attack the name plate on the grill. This is best done with a sharpened toothpick. |


We hope these little notes have helped you with your modelling and hope to hear from you soon.
Thanks,
The Modeller’s Workshop